Here is my final modelled head. I really enjoyed this exercise but found learning new skills hard at times, but when I saw the model coming together it all seemed worth the effort. If I had more time I would of liked to try the UVW mapping mode to finish the face and apply textures.
Friday, 23 October 2009
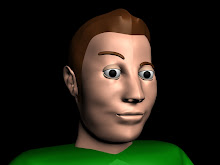
Stage 13 - -Final Model
Here is my final modelled head. I really enjoyed this exercise but found learning new skills hard at times, but when I saw the model coming together it all seemed worth the effort. If I had more time I would of liked to try the UVW mapping mode to finish the face and apply textures.Stage 11 - Attached Ear
 Here is the final image of the attached ear. Out of the whole project, this was the most complicated part for me with the aspect of attaching two seperate objects into one. After many hours work though, I had a finished product I was happy with.
Stage 10 - Ear Creation
 Heres the initial creation of the ear which was to be attached to the head. I had a few problems with creating quadrants and instead settled for a few triangles in the structure.
Stage 9 - Ear and Neck Topology
 In this stage the topology for the ear was added to the original reference plate as well as the topology for the neck. Both these aided in the creation of the back parts of the head in 3D Max.
Stage 8 - Head Creation
 For the creation of the head I used a sphere to create the shape before pulling out edges to create the final head shape. First attempt saw the neck too slim which I later corrected by pulling out the verticies. I was pleased with the shape of the head at this stage (apart from the slim neck look)
Stage 7 - Cavity Creations
 The final tweakings of the face were the nose, lips and eyelids which were made following the tutorials. Due to my quite long nostrils, it was hard to get the nostril cavity right but after some spent hours the face finally looked human.
Subscribe to:
Posts (Atom)